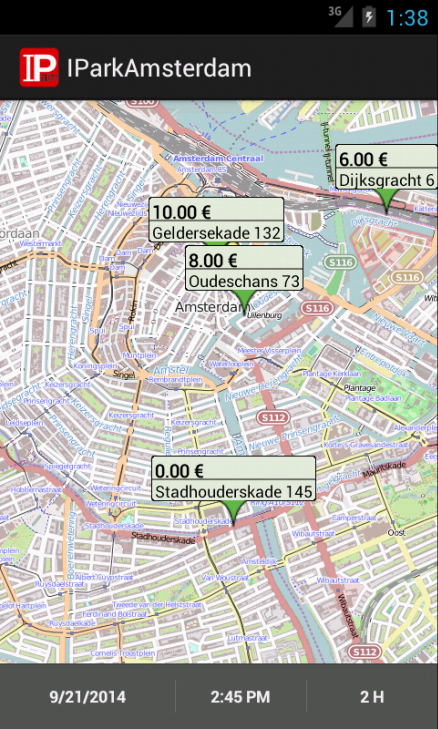
A long time ago (really, it feels like ages) I wrote a small Android application to help people find less expensive parking places in Amsterdam making use of Glimworm SharkPark API and OpenStreetMaps.
Today, one year and five months after the first release, I decided to set the application free and opensource it.
The code is available at github/migtavares/IParkAmsterdam and I invite everyone to fork it and send pull requests.
I can tell you that today's morning was a fun one... lots of remembering how things were done last year.
I'm trying to get back to my own projects in my own free time which has been a most scarce resource of lately.
One of the first steps I'll take is to update this web page (this blog entry), then I'll move on to:
- make this web page a bit nicer, with the blog a little bit easier to navigate and maybe even find out a way to have comments (without using third parties and avoiding spam);
- get the android projects back to a healthy state. Some, such as I Park Amsterdam, are in urgent need of some care. Other, like Windsurf Buddy, have lots of new features almost ready for deployment but need some polishing and bug fixing.
Keep tuned for more...
The implementation of equipment management within Windsurf Buddy is proceeding although at a pace that is not as fast as I would like.
So what's done until now?

Browsing the equipment in the database is pretty much done. A rolling tabs header and then a simple straight forward list of equipment.
Taping the plus action creates a new equipment of the type of the currently selected tab. Taping on a equipment item brings up a new activity to view that specific equipment. A long tap on any equipment of the list will toggle into the list into multiple selection mode that can be used to remove several item. Maybe in the future it will also enable exporting the selected equipment... we'll see.
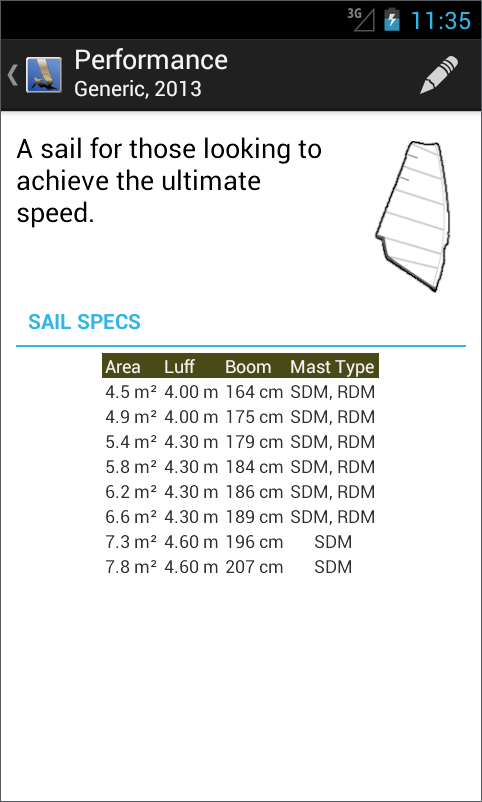
Viewing each equipment is now a activity on its own instead of a floating dialog. I feel that it makes better use of screen space and being an activity allows for future integration with other applications. The layout is similar the one used for viewing contacts making it a familiar display to the user.
The little pencil action allows to launch a editing activity for the equipment being viewed.

Editing a equipment is still a ongoing implementation. Done are editing the name of the equipment as well as it's brand, collection and description. The real slaving will be over editing the very specific details of each equipment. I don't want to have a implementation that is tide to each equipment but would rather have a more generic approach.
The green plus signs right of the brand and collection selectors will be used to quickly create a new brand or collection, speeding up the insertion of new equipment.
It's done, migrating the blog post entries from bitpipeline-it to my own ikiwiki powered blog. All migrated posts are tagged with bitpipeline-it.
This was far harder than what I expected. Google takeout does allow us do download the content of our blog as a atom feed witch all entries mangled in one single line (136482 columns wide) and the original html almost gone.
I could probably create some python script to translate between this format and the markdown that is use for this Blog but in the end I decided to do the manual labour of copying the original post source (still available through the blogspot dashboard) and format it by hand. Took some time but keeps the quality up instead of polluting it with html tags.
Now this was possible with the 17 entries of the bitpipeline-it, but bitpipeline with its 117 entries it's too much work to do by hand. So a script is called for but I still have to decide how to do it:
- parse the atom feed provided by the google-takeout
- scrap the blogspot dashboard, retrieving the content of each post entry by editing it
The second option looks like more work but the end result is text that is a lot more readable.
The question left in the air is: why can't I retrieve my blog post entries in their original format? The nice html that I took care to write for such an eventuality...
Lately I have been working on having a proper database of equipment for Windsurf Buddy and using the database engine to do most of the processing of providing the best equipment advice. Until now the equipment was a static collection of Java objects and resources.
I have several hopes on the result of development:
- easier to extend suggestions: for example also provide masts advices according to the sail specifications and brand "affinity" (some sails work better with some mast brands);
- user management of the equipment (adding, editing, deleting, etc);
- sharing of equipment data between users and a central equipment repository (still just an idea).
The database schema for now is composed of around 20 tables - not that many but keep in mind that this is running in phones, even older Android phones too. To avoid writing lots of code that translate SQL results into Java objects (a ORM) I'm using ORMLite. Some, if not most, of the queries to the database are still almost raw SQL.
Until now it this approach work well but is still far from being comparable to the existing static objects and resources implementation. That moment is nevertheless getting closer and the next 1.5 release will start using this database for the equipment.
Acording to Google statistics Windsurf Buddy has pass the mark of the 1000 active users on 10th of Jully. It's rewarding to see that this small project is growing.
My thanks to the all users.
Don't forget that you can join the Google+ Windsurf Buddy.beta community and get early beta versions of Windsurf Buddy.
Since the last great Google I/O 2013 its possible for android developers using deploying Google Play to distribute their applications to also release alpha and beta versions to a exclusive set of users. The way Google uses to define that set of users is using a Google+ community of a Google Groups. I decided to give it a trial with the former.
So now available at Google+ is a community of adventurous people that don't mind trying the beta versions of Windsurf Buddy: Google+ Windsurf Buddy.beta community. Feel free to join in.
Today I am going to release the beta 3 of version 1.4. If everything feels solid and working properly then I'll upgrade to production.
So what is new/different in the new version? In terms of features maybe not much has change - added support for dagger fins and removed the wind speed converter that is available as a single application with more capabilities than while a feature of Windsurf Buddy. The major change is in the UI and the underlying code.
Planed for the near future are some improvements in the algorithms used to calculate sail size and fin length. Specially when it comes to racing and speed windsurfing. Then the management of equipment has to be implemented. That is bound to be fun... 
I do hope you enjoy it.
I've been thinking about implementing a simple Android application that uses mapping for quite a while but never found the time or the right idea to start.
Yesterday I participated in a Appsterdam event with the guys from Glimworm showing and talking about Park Shark API, the Open API they created for querying the price of parking in the city of Amsterdam.
Today, after enjoying a nice bicycle ride (first day of the year were you could go out with a simple sweater), I decided to get my hands dirty and create a small application that made use of the Park Shark API and some mapping solution.
I don't really want to use a Google Maps Android API key for this small applications and I am a big fan of Open Street Maps (OSM) for quite a long time. Searching for possible ready to go solution that would allow me to use OSM within a Android application lead me to the project OSMDroid that provides a very similar API to the Google Maps API.
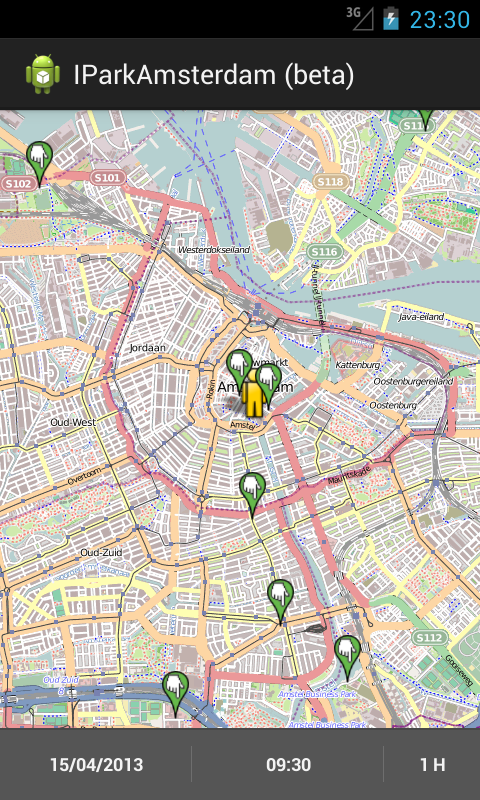
The name of the application includes a beta but it's really just very preliminary code. I did have fun writing it, and had some struggles to get things going as I desire. Specially when it comes to the interaction with the map.
A new release of WindSpeed Started to use the API key for use when contacting the Open Weather Map servers and better user notification of error when updating the weather station information.
Work is on going for the next Windsurf Buddy version.
The equipment advisor is getting to be slightly more capable than the previous one, with more rule matching to make sure that only the things that make sense show up. For example if a user chooses a Beginner use case then it doesn't make sense to show windsurf disciplines like wave.
The next screenshot is just a view of my desktop while working on Windsurf Buddy. Would you believe that I have fun this way?
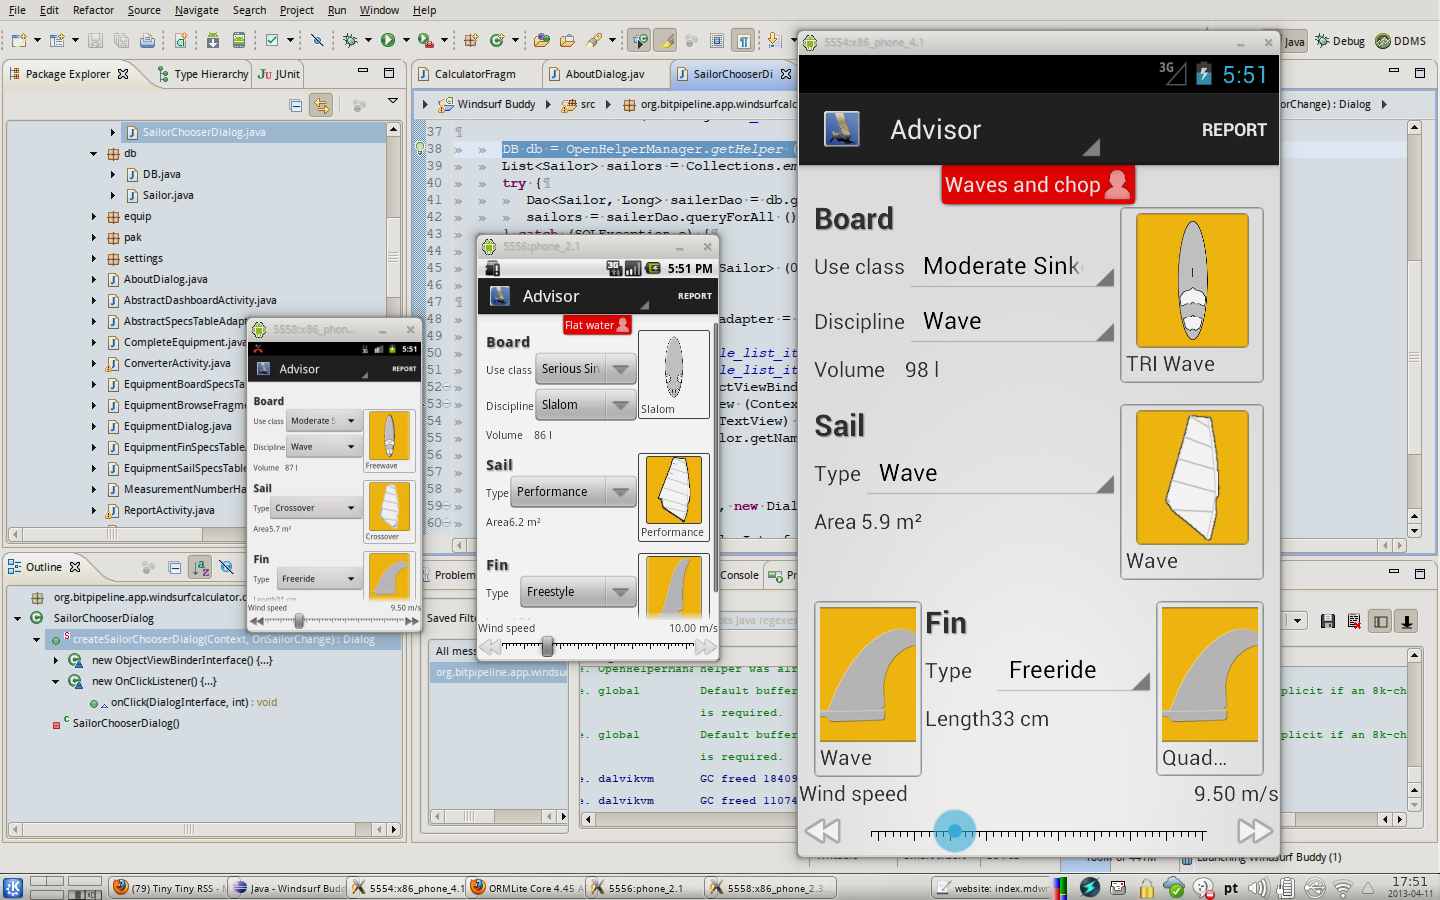
Another things that I have been toying is the presentation of the multi-fin information. I don't know if this right/left looks nice (the one shown in the bigger Android emulator window).
One good news in regard to fin selection: it will be possible to change the balance of the fins length -- have more control or earlier planning. I'll write more about this soon.
It's has been quite a while and Windsurf Buddy is in need of some care. Specially the UI, which feels old fashion -- it has a clear Android Gingerbread feel to it.
So it was time for a revamp of the UI and to take advantage of the new features of the Android OS such as fragments and new Holo style.
It's far from finished. Much work still ahead before the next release.
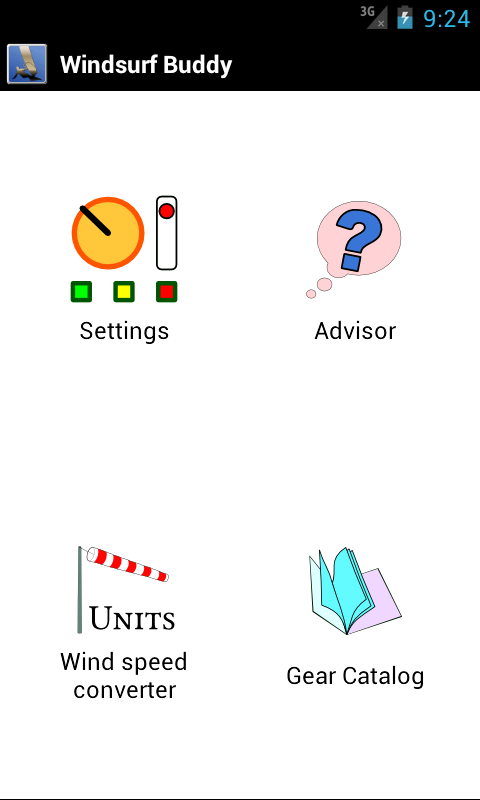
The old dashboard is gone. I think it made sense at the time (so many other applications were also using it) but it became old fashion rather quickly. With good reasons actually. With this redesign when starting Wind speed the user will be presented with exactly what he is expecting to use: some good tips on what equipment to use.
The rest of the application can be reached either by using the navigation within the application bar or, for some very specific activities, by using the menu.
One feature I think I'll drop from the application is the Wind Speed Conversion but will probably integrate it with the Wind speed application. No duplication of functionality and it will be a lot easier to manage.
On the other hand.. I'm dying to squeeze some new features like adding equipment definition which would enable the user to add it's own equipment.
Actually, it's a lot more than dropbox, It's also a calendar, contact manager, media player, etc. OwnCloud, what a great project.
Installing the OwnCloud server.
You need to have a web server that suport php and cgi and a database server. I choose to continue to use lighttpd and postgresq.
Here is my list of USE flags for the relevant packages:
dev-lang/php            cgi curl gd imap inifile pcntl pdo postgres threads xmlwriter
www-apps/owncloud       -mysql -sqlite postgres
www-servers/lighttpd    libev php webdav
Note: if you want to have your web root to be somewhere else than the default then you have to tell webapp-config it's location. Do so by editing the file /etc/vhosts/webapp-config and change the value of the variable vhost_root to the base location of your web server (the directory that will contain the htdocs). It's the same as in the /etc/lighttpd/lighttpd.conf variable var.basedir.
With gentoo you have to tell portage to accept keyword for the package www-apps/owncloud and emerge it.
Then edit the lighttpd.conf and add the following:
$HTTP["url"] =~ "^/owncloud/data/" {
    url.access-deny = ("")
}
This will tell lighttpd not to directly publish the files under ownCloud control. You can also change the location of this directory to somewhere else — you'll be asked for it's location the first time you access ownCloud, when you'll be presented with a nice wizard to setup the administrator user credentials, the database connection and data directory location.
Syncing with the linux desktop
To set the client in a gentoo host you must emerge the packages (it's hard to actually find out which ones are needed):
net-misc/csyncnet-misc/mirall
Then start owncloud in your desktop (it will show up in the systray). Follow the wizard to set up the first configuration and then stop it so that you can set the server target directory to the root (it will be forced to be clientcsync) Edit the file ~/.local/share/data/ownCloud/folders/ownCloud and change the line
targetPath=clientcsync
to
targetPath=
Start the owncloud again and now the directory ~/ownCloud will be synchronized with the server and the other devices. Magic!
I guess this could also be acomplished by setting a new folder to sync with the user root of the ownCloud, but what's the fun of that?
One thing I would like to find is how to do the synchonization without a X server. Something I still have to research how to do.
For the android devices
This is as easy as installing the owmClient Android client (or at FDroid) and follow the nice wizard.
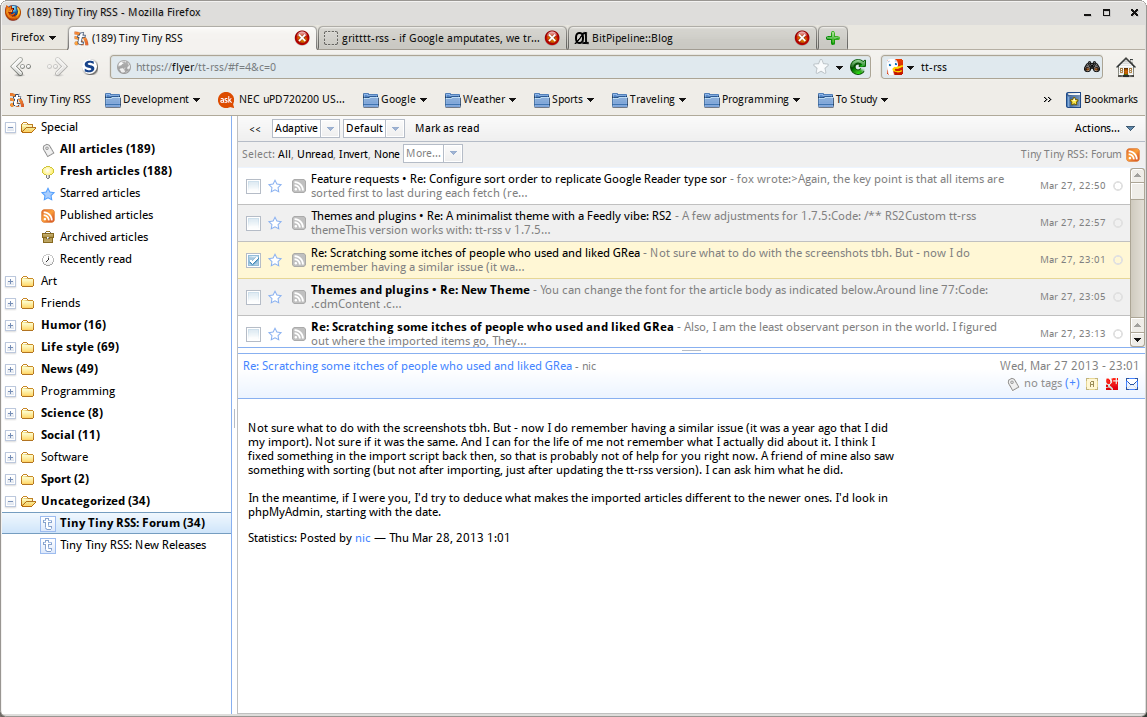
Here at BitPipeline we do like to read our internet news on a bunch of different devices and the soon to be dead Google Reader fitted that role perfectly (thanks to the easy to use Web and Android applications).
With the dismiss of Google Reader on the horizon I set myself the task of during one weekend finding the best alternative. After reading some articles and looking at the different choices out the in the Internet the set of possible solutions was:
- Feedly : too much emphasis on images and a design that might appeal to Mac aficionados but doesn't ring my bell. No API to integrate with other applications/services. Closed proprietary source.
- NewsBlur : Really nice except for the abuse of intense colours in the design. Also doesn't seem to export any API. OpenSource, so should be possible to self host. Supports sharing within NewsBlur host.
- Tiny Tiny RSS : (also know as tt-rss) Simple elegant design. Exports a API (can be switched on/off). Supports sharing to social Networks, to a rss feed or within the same tt-rss instance. Supports plugins. Can use the same keyboard shortcuts as Google Reader. Open source. Themable (even to the point of looking a bit like Google Reader).
Tiny Tiny RSS was a clear winner.
I had lying around a old Asus eeePC 901 and so I set myself to install gentoo and set it up to be the host of my tt-rss. This will be a post by itself - I used some of the great gentoo features to make this install and maintenance as easy and smooth as possible.
This looks like it has been good of Google to trigger this migration. Good for me, maybe not so good for Google in the long run (I am going more and more for the self hosted services option as cloud services are proving to be just vapour).
Bug fixes, some visual improvements and some minor features for the lates release of Wind Speed Converter.
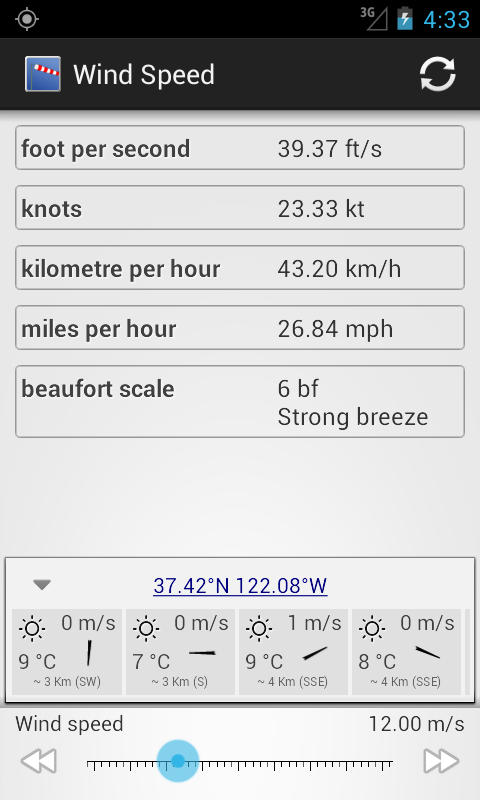
Now some nice weather pictogram are shown in the weather station information.
Clicking on the weather station opens a dialogue window where one can choose to see it's location on a mapping application or to dig into the details of the station on it's Open Weather Map Web page.
The releases since 1.5 also bring some bug fixes:
- a issue with the application styles that were blocking the application from running in Android 3 devices was fixed;
- the connection to the OWM server was made more resilient;
- made sure that there were no repeated units being displayed (the wind speed unit selected would show up in the list of converters and in the wind speed selector).
A Google Plus product page was created as an experiment on ways to share information about Wind Speed Converter and maybe receive input from its users.
A new almost complete recode of Wind Speed Converter is now published. The new version uses a lot of the open source projects to provide a more up to date experience and more features.
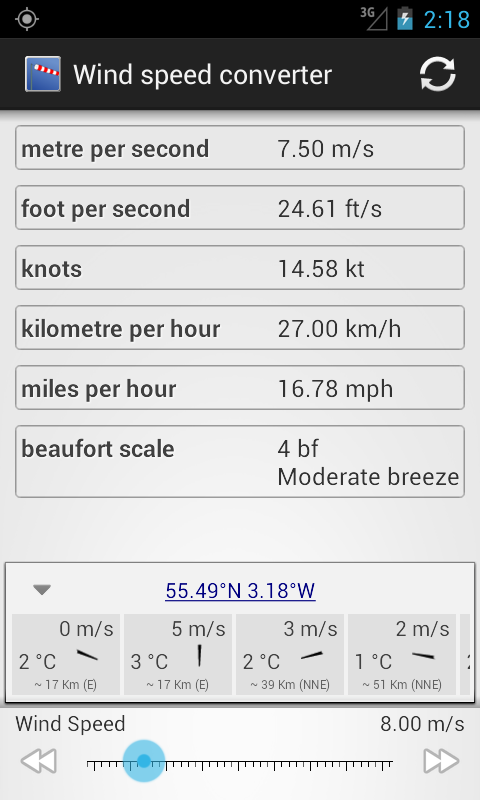
One of the most visible features is fetching local weather station info from Open Weather Map. It's still a "half baked" feature as there is a lot more that can be presented to the user about the local weather.
But it's in the development side that this application had a huge change (let's hope it's a evolution).
In order to have a consistent user interface and to have a manageable amount of source code I decided that it was time to join the trend and just use ActionBarSherlock (ABS) which causes the android support lib to also be included in the application. With this two libraries the development is considerable simplified when going for supported devices that range from Eclair MR1 (android 2.1) to Jelly Beans MR1 (android 4.2).
A unfortunate side effect is that the final application package grows quite a lot: from 51 Kib (in version 1.0) to 572 Kib (in this latest version). A big part of the size increment is due to all the new images and other resources that ABS and the support library have to include to be able to give a nice UI in older Android versions. ABS uses more or less 1.5 Mib of uncompressed resources.
Wind Speed Converter is still a rather small application and newer functionality will probably not have such drastic effect on the size of the application package.
I had to dig for a while (some 10 minutes) to get my android fragments to receive the attributes form the xml layout.
This is how I got it working.
Starting by with a fragment (I'm using Jake Burton's ActionBarSherlok but the same should work when extending the support or original fragment classes):
    1: class MyOwnFragment extends extends SherlockFragment {
    2:         /* fragments attributes */
    3:         private int    padding = 8; // default value that will be overridden if there's a layout attributes
    4:         private String lavel   = ""; // default value that will be overridden if there's a layout attributes
    5:
    6:         @Override
    7:         public void onCreate (Bundle savedInstanceState) {
    8:                 super.onCreate (savedInstanceState);
    9:                 if (savedInstanceState != null) {
   10:                         // use the saved state that was set in the #onSaveInstanceState
   11:                 }
   12:         }
   13:
   14:         @Override
   15:         public void onSaveInstanceState (Bundle outState) {
   16:                 // save the state of our fragment into the outState bundle.
   17:         }
   18:
   19:
   20:         @Override
   21:         public View onCreateView (LayoutInflater inflater, ViewGroup container, Bundle savedInstanceState) {
   22:                 View fragmentRootView = // what ever you need, inflate a layout, progamatically create a view, etc.
   23:
   24:                 // if there were attibutes in the layout XML
   25:                 // then we would have captured them in the #onInflate method
   26:                 // so we would already have them available
   27:
   28:                 // we can also use the savedInstanceState here
   29:                 // to set child views of GroupView for example.
   30:
   31:                 return fragmentRootView;
   32:         }
   33:
   34:         @Override
   35:         public void onInflate (Activity activity, AttributeSet attrs, Bundle savedInstanceState) {
   36:                 super.onInflate (activity, attrs, savedInstanceState);
   37:                 TypedArray typedArray = activity.obtainStyledAttributes(attrs, R.styleable.MyOwnFragment);
   38:                 if (typedArray != null) {
   39:                         // this is where we can get out attributes.
   40:                         // we can "parse" them into class fields
   41:                         this.padding = typedArray.getDimensionPixelSize (R.styleable.MyOwnFragment_padding, this.padding);
   42:                         String labelAttr = typedArray.getString (R.styleable.MyOwnFragment_label);
   43:                         if (labelAttr != null) {
   44:                                 this.label = labelAttr;
   45:                         }
   46:                 } else {
   47:                         // no attributes are defined
   48:                 }
   49:         }
   50: }
The R.stylable.MyOwnFragment is a reference to the styleable defined at res/attrs.xml:
    1: <?xml version="1.0" encoding="utf-8"?>
    2: <resources>
    3:         <declare-styleable name="MyOwnFragment">
    4:                 <attr name="padding" format="dimension" />
    5:                 <attr name="label" format="string" />
    6:         </declare-styleable>
    7: </resources>
And finally in the layout file:
    1: <?xml version="1.0" encoding="utf-8"?>
    2: <RelativeLayout
    3:         xmlns:android="http://schemas.android.com/apk/res/android"
    4:         xmlns:app="http://schemas.android.com/apk/res/our.package.name"
    5:         android:layout_width="fill_parent"
    6:         android:layout_height="fill_parent">
    7:
    8:         <fragment android:name="our.package.name.MyOwnFragment"
    9:                 android:id="@+id/myOwnFragment"
   10:                 android:layout_width="wrap_content"
   11:                 android:layout_height="wrap_content"
   12:                 app:padding="2dp"
   13:                 app:label="Fragment label" />
   14: </RelativeLayout>
Now the trick I had to find was that the we need to use the namespace of our application in the layout XML or it doesn't work (the attributes do not arrive at our fragment onInflate method). The strange thing is that the android lint will then complain that the defined namespace is not used but if we ignore the warning everything works fine.
The Fragment documentation and the sdk example are not very helpful. They reuse the android namespace but that seems not to work (for me at least) as then it complains that the attribute is not recognized.
I use genkernel (docs wiki) to automate the process of compiling the Linux kernel and building and installing a initramfs to be loaded as a ramdisk. It works fine.
There was just one pet peeve with it: when booting the ramdisk it would always look for all the modules of hardware storage and file systems and try to load them. This is a safe procedure as it make sure that the computer will boot with everything working.
So while looking at the options available at the configuration file /etc/genkernel.conf I came across one that looked promising:
# Don't copy any modules to the ramdisk
RAMDISKMODULES="0"
Whenever I configure a new kernel I always tailor it for the target host and include all the needed hardware support that it needs to successfully boot in the kernel instead of as a module. This means that the kernel image might be a bit bigger than if everything was a module, but it's faster to boot.
I gave it a shot and created a new initramfs without any modules and...
... it works great. The boot is a faster and afterwards the kernel space is not "polluted" with modules that are not in use at the moment (such as jfs, xfs and RAID modules).
Whenever a development problem looks like it can be solved by bringing in a new external code dependency I think it can be beneficial to wait a moment and think it through. Most of the times it does make sense and the functionality provided by code that is tested and used widely shadow any issues with increasing the project list of external code.
Some other times the use of yet another dependency is just a sign of sloppy or lazy thinking. Let me provide you with an example.
The purpose of the following code is to obtain a InputStream from a String. The code was written by a developer with whom I had to work. This developer didn't seem understand java.io, something I consider to be a base know-how for a Java developer.
Here's the mentioned developer solution:
    1: import java.io.InputStream;
    2: import org.apache.commons.io.IOUtils;
    3:
    4: /* a class definition, some methods, and finally: */
    5:
    6:         String abc = "ABC is just the beginning...";
    7:         InputStream is = IOUtils.toInputStream(abc);
    8:
    9: /* and more code.. */
IOUtils comes with the great library commons-io from Apache commons. That dependency was brought into the project in question just for this purpose. There's no other usage of the library in any other part of the project.
Now here's is a somewhat different way of achieving the same result:
    1: import java.io.InputStream;
    2: import java.io.ByteArrayInputStream;
    3:
    4: /* the same class definition, the same methods, and finally: */
    5:
    6:         String abc = "ABC is just the beginning...";
    7:         InputStream is = new ByteArrayInputStream(abc.getBytes());
    8:
    9: /* and the rest of the code */
Notice how no dependency is used and the exact same result is achieved. IOUtils.toInputStream does almost exactly the same as in this last code example.
I have seen this happening more and more (sometimes with dependencies that are a lot heavier than commons-io) and I believe it's one of those sign that the developer is out of his depth. I see it happening so often that I actually decided to coin this with a new word: dependencitis.
- dependencitis
- a symptom that a developer is using google to search for copy&paste solutions instead of using the grey matter trapped inside his skull to come up with more appropriate code
A developer is only as good as his knowledge of the tools of his trade.
Just published a new library to interface with the services from OpenWeatherMap (OWM). License is Apache v2 and you can get to the source code by going to:
It's not complete (doesn't yet support all the services OWM does) but it it already makes it easy to get to know the weather status and forecast.
An example of getting the current weather status for the city of London, UK:
    1: OwmClient owm = new OwmClient ();
    2: WeatherStatusResponse currentWeather = owm.currentWeatherAtCity ("london", "UK");
    3:
    4: /* Let's see if it's raining... */
    5: if (currentWeather.hasWeatherStatus ()) {
    6:         WeatherData weather = currentWeather.getWeatherStatus ().get (0);
    7:         if (weather.hasRain ()) {
    8:                 Precipitation rain = weather.getRain ();
    9:                 if (rain.hasToday ()) {
   10:                         if (rain.getToday () == 0)
   11:                                 System.out.println ("No reports of rain in London");
   12:                         else
   13:                                 System.out.println ("Another report of rain in London");
   14:                 }
   15:         } else {
   16:                 System.out.println ("No rain information in London");
   17:         }
   18: }
I decided to publish the current state of the library I created and use to deal with measurements in my own projects. It's still not complete but it's usable and seams to work well.
The source code can be consulted at:
It's published with a very permissive Apache License 2.0 but I would like to know if anyone else is using it.
The library api docs is available at units apidocs.
For now it has support for:
- all basic dimensions (as defined by SI);
- some units in all the basic dimensions (more can be added);
- quotient dimensions and units
- product dimensions and units
- prefixed units
- measurements and measurements listeners. By design it supports only float and double type of measurements. Think of measurements listeners as wires that connect electronic components;
Some time ago I was talking with some friendly software developer about programming languages. They now have a "pet" language, one they believe to be adorable and cute, and decided to use it mostly on everything they do.
The language in question (Scala) is not a bad language but it's also not a "WOW!" kinda of thing. It's just another one, in this case even tied to the same java virtual machine as java itself usually is (not mandatory, but usually).
This made me think. If I was to choose a language for a project with developers that come and go as they please and be as sure as possible that in the future the new crop of developers would be able to pick up where the previous one left, which language should I choose?
I find it a lot harder than I though on how to decide which, but I managed to decide by negatives.
Now... keep in mind that is is just my opinion, formed while commuting so it is most likely wrong.
First a decided to drop all non strongly typed languages. They are all fun and games until the software gets bigger, bugs start to crop in and developers have no shield over small design mistakes. With a typed language those mistakes would jump in the screen in front of the developer until he fixed it.
This lead to the dropping of most interpreted languages such as python and ruby (I do like the first, don't really care about the later).
Then it must be a language that can be cross compiled and run in different hardware and operating systems. Bye bye all the .Net stuff. While Objective-C as a language is not actually tied to Mac OS or iOS it's quite hard to develop for other platforms for the lack of libraries (yes, I am aware of, and appreciate, the GNUStep effort).
Another good source of input when thinking about what programming language to use is the TIOBE index. Scala doesn't do very well there by being in position 34 (way behind that dinosaur called COBOL).
The top programming languages that fulfil the requirements I just stated are: + C + Java + C++
Another good input on how popular a certain programming language is among developers is by using google trends to compare the rates of search on each language. Here it's:
Notice how Scala doesn't even show up... Oh well.. It might mean that my friends will be able to pull a developer with a unique skill latter in their career. I hope they will, 'cause then I'll have them pay me the drinks.
In the end of last year I came across the some code similar to the following:
    1: public class SingleValue<T extends Object> {
    2:   T object;
    3:
    4:   public SingleValue (T value) {
    5:     object = value;
    6:   }
    7:
    8:   public boolean equals (SingleValue<T> other) {
    9:     if (other == null) {
   10:       return false;
   11:     }
   12:     if (other == this) {
   13:       return this;
   14:     }
   15:     if (obj.getClass () != getCLass ()) {
   16:       return false;
   17:     }
   18:     SingleValue<T> otherSingleValue = (SingleValue<T>) other;
   19:     return new EqualsBuilder()
   20:       .appendSuper(super.equals(obj))
   21:       .append(object, otherSingleValue.object)
   22:       .isEquals();
   23:   }
   24: }
Some, if not most, of you will recognize this from apache commons EqualsBuilder.
When searching for reverences to this SingleValue class and all one would find were instances of the type SingleValue<String> and, upon asking the team that was maintaning that code, it was clear that no other generic type would ever be used.
In effect this class can be deleted and the instances of this class can then be changed, without any loss of reliability, to a simple instance of type String.
If before one would have something like:
    1: SingleValue<String> stringValue =
    2:   new SingleValue<String> ("Hello garbage collector!");
    3:
    4: if (stringValue.equals("All is fine, nothing to see.")) {
    5:   System.out.println("It's all fine.");
    6: } else {
    7:   System.out.println("Upsy daisy!");
    8: }
would become a much simpler:
    1: String stringValue = "Hello garbage collector!";
    2:
    3: if (stringValue.equals("All is fine, nothing to see."))
    4:   System.out.println("It's all fine.");
    5: } else {
    6:   System.out.println("Upsy daisy!");
    7: }
The more complex solution of using the SingleValue<String> has some "low-level" drawbacks:
- creating unnecessary objects. If you compare two
SingleValue<String>you will in fact be creating theStringobjects and the encapsulating them inSingleValueobjects. So twice as many objects created for everyStringthat is necessary. - when using the
equalsmethod aEqualsBuilderinstance is created and two of it's methods are called. The first,appendSuper(boolean), is a rather light and probably will be inlined. The second one on the other hand is not so light. Theappend(Object, Object)will do several checks before eventually reaching theString.equals(String)that is to be used.
Which would you prefer to maintain?
I decided to make a application that follows the same ideas as Windsurf Buddy but for kite surfers as the target audience.
You can read more about it in it's page (Kitesurf Buddy) and download it at Google Play
At just a little short of 200Kib I guess it might be a good companion for the kitesurfers. Let me know what you think about it. I'll try to improve it and add functionality.
I decided to make a tiny application to convert between wind speed units. You can read more about it at Wind speed converter or at Google Play.
With a size of 50Kib it is probably one of the smallest applications you can install in your phone.
Work has been going on with WindsurfBuddy. Some of the new visible features that will come up in the next release include:
- A initial dashboard to navigate the application;
- A wind speed unit conversion tool;
- Support for the Beaufort scale;

Much of the development effort since the last release was directed at improving the internals of the application, making it more modular and (hopefully) more extendible.
Already in place is the initial support for having file packages of equipment. Until now all the equipment visible was compiled in with the application. That would never be a solution for having more stuff in it. I plan to use this feature as a way to allow new sets of equipment to be downloaded but also to be shared between users.
I am thinking of trying this with the new Application Packages that Google Play supports. This App Packages are nothing more than a file that is downloaded and installed with the application. The plan is to distribute some race equipment with such a package (boards, sails, fins). If it all goes well the users will see that new equipment in the advisor and gear catalogue.
Just pushed a improved libFriendlyJSON. As far as I can tell it's pretty flexible and robust.
An example of usage:
    1: class SmallClass extends JSONEntity {
    2:         String name;
    3:
    4:         /* You must always have this constructor in JSONEntities. */
    5:         public SmallClass (JSONObject json) {
    6:                 super (json);
    7:         }
    8: }
    9:
   10: class Entity extends JSONEntity {
   11:         boolean aBoolean;
   12:         byte aByte;
   13:         char aChar;
   14:         short aShort;
   15:         int aInt;
   16:         long aLong;
   17:         float aFloat;
   18:         double aDouble;
   19:
   20:         String aString;
   21:         Map<String, String> aMap;
   22:         Map<String, List<String>> aMapOfLists;
   23:
   24:         SmallClass[] arrayOfSmallClass;
   25:
   26:         transient int transientValue;
   27:
   28:         /* You must always have this constructor in JSONEntities. */
   29:         public Entity (JSONObject json) throws JSONMappingException {
   30:                 super (json);
   31:                 init ();
   32:         }
   33:
   34:         private init () {
   35:                 this.transientValue = this.aInt;
   36:                 if (this.aMap == null)
   37:                         this.aMap = new HashMap<String, String> ();
   38:                 if (this.aMapOfLists == null)
   39:                         this.aMapOfLists = new HashMap<String, List<String>> ();
   40:         }
   41: }
And then, somewhere on the code:
    1: Entity entity = new Entity ();
    2: /* ...
    3:  * set the content of entity
    4:  * ... */
    5: JSONObject jsonObj = entity.toJson ();
    6: String jsonString = entity.toString (4);
    7: String jsonObjString = jsonObj.toString (4);
    8: /* jsonString and jsonObjString will be equals. */
    9:
   10: Entity fromJson = new Entity (jsonObj);
   11: Entity fromString = new Entity (jsonString);
   12: /* entity equals fromJson equals froString */
It supports things like fields declared with inner classes (static or not) as type, enumerations, arrays, lists, etc. It feels usable to me.
A particularity of Java makes it impossible to use initialization of fields when declaring them, as the fields are set by the super class and (when super (json) is called) and then the class initialization takes places, overwriting any value already set. The possible solution is to use a init method that set the fields (or we could do the initialization at the constructor but I guess it's more usual to other constructors so sharing the initialization code might be a good idea.
Inside this very small library is a great deal of reflection usage. In old JVM that would take a big toll on performance, nowadays it seams to be not so bad.
Feel free to have a look around, use the library and specially do share any idea of improvement or bug fix with me on github.
After some working on enterprise software for quite a long time I got used to using a ORM when dealing with structured storage so when writing application for Android it's hard to let go of that habit.
After searching for a while there was one ORM that was slightly better than the other I read about: OrmLite because it allowed me to easily write my own entities and had specific support for Android. The drawback is that it makes strong use of reflection (which might have some impact on performance).
I actually think that it should be possible to create a ORM that uses annotations and Annotation Processing Tool(apt) magic to easily create the entities. In fact I started to create such a thing but time is a wasting. Maybe in the future I'll get back to this project. I could probably use the same annotation names and interface as OrmLite... hummm....
Some important things to look out when using OrmLite:
- when using a DAO you have to do a explicit cast to Class or the java compiler will get utterly confused with the generics and refuse to compile. You can see an example code bellow. The examples provided with OrmLite actually don't compile unless you change them and force the casting. The error the compiler throws up is something like:
Error: type parameters of <D>D cannot be determined; no unique maximal instance exists for type variable D with upper bounds
    com.j256.ormlite.dao.Dao<java.lang.Object,java.lang.Integer>,
    com.j256.ormlite.dao.Dao<capture#296 of ?,?>
An example, assuming that there is a class Entity that is defined and annotated according to OrmLite rules:
    1: @SuppressWarnings ({ "rawtypes", "unchecked" })
    2: public class DBManager extends OrmLiteSqliteOpenHelper {
    3:         /* Fill with code... */
    4:         public Dao<Entity, Long> getEntityDAO () throws SQLException {
    5:                 return getDao ((Class)Entity.class);
    6:         }
    7: }
Note: this behaviour seams to go away with java 7 but Android SDK still requests version 6 and as the cast won't do you harm when compiling with jdk7 then I guess it's better, for the time being, to keep the cast in place.
- if you want to use proguard to obfuscate your code then there are some rules you must add to your proguard configuration:
# for ormlite stuff
-keep class com.j256.**
-keepclassmembers class com.j256.** {*;}
-keep enum com.j256.**
-keepclassmembers enum com.j256.**  {*;}
-keep interface com.j256.**
-keepclassmembers interface com.j256.**  {*;}

# keep the classes and members of our entities or OrmLite will not work
-keep class our.package.with.database.entities.**
-keepclassmembers our.package.with.database.entities.** {*;}
This should be, hopefully, enough to keep proguard from obfuscation the classes that OrmLite needs to use via reflection.
Finally had some time to setup up the blog. Not as easy as I expected as I run into problems with the hightlight plugin and I do want to be able to share pieces of code with pretty colours.
The problem was that gentoo doesn't install the source-highlight perl bindings. I believe that the reason why is that they don't work. At least after I managed to install them by hand there were problems with some "lua" calls (I forgot what was it).
I got it to work by overriding the highlight plugin and parsing the input by forking the source-hightlight, feeding it with the input and retrieving the html output. Crude, yes, but it looks like it's working.
    1: void main () {
    2:     printf("hello, world!");
    3: }
It took me quite a while from finding the problem, trying out to have the original plugin working (and giving up) and changing the original code to the presented solution.
Now... why didn't the author of the highlight plugin though about surviving not having the perl highlight bindings like this.
Windsurf Buddy seams to be doing well as there is a constant increase of active users. That makes me happy and eager to give new functionalities to the application.
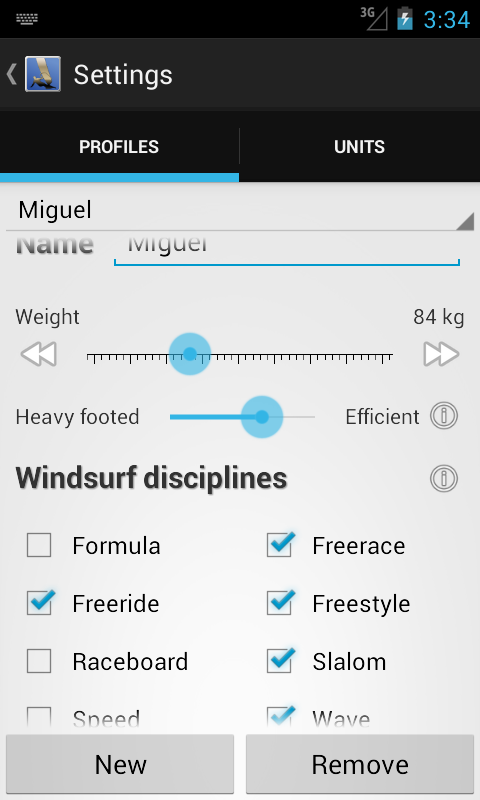
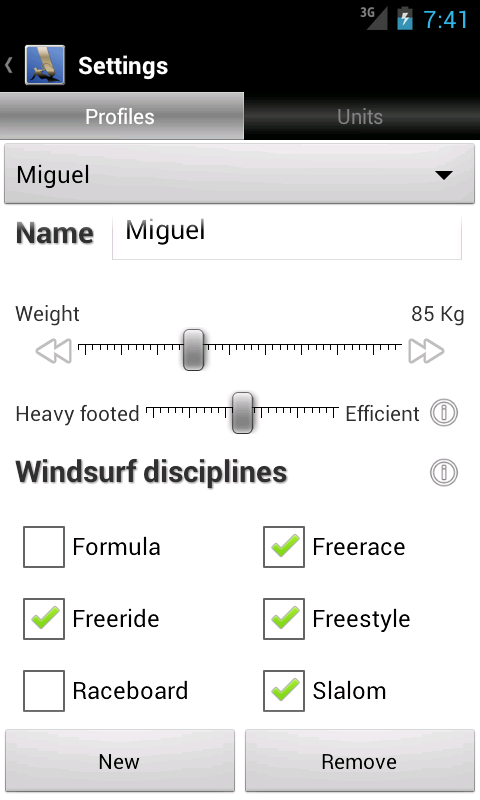
So what have I been working on? Well, already done is the support for sailor profiles and for how efficient the sailor is. Going on is the implementation of the windsurf classes (or disciplines).
The efficiency of a sailor deals with the pressure on the back foot. Efficient sailors put less weight on the tail of the board. When the weight is more on the front foot strap the board is more flat on the water and so it plan earlier, it's faster and more stable.
It's not so easy to be a efficient sailor. You have to deal with the constant feeling of going for a catapult and as the front leg is more solicited it's also more tiring.
By selecting one or more windsurf classes you lower the number of equipment that is shown on the equipment advisor. For example if you only want to sail waves you wont wast visual space with race and slalom boards.
The "Downloads" tab that is visible on the screenshot will not be available so soon. Only on version 2.0, when I plan to start integrating the application with network services (things like current weather, downloading more equipment, uploading sessions, etc). There are lot's of features to implement before that…
Developing for android has this type of things. You need to support older versions of the OS, with older ways of interacting with the user, but at the same time provide a more up-to-date experience.
Tabs on android were (on android 2.*) only changeable by pressing on each of the individual tabs on the TabWidget. Nowadays everyone expects to be able to change tabs with a simple swipe left or right, so some hacking is called for. Here is my solution (there might be a simpler, easier way, that I'm not aware of).
Quick How to
- Use a
android.gesture.GestureOverlayViewas the child of theTabHostand place the original contents inside that element; - in the activity with tabs implement the support for listening to the gestures;
- set the
GestureOverlayViewto invisible gestures and make the activity the listener for the gestures; - store the position and time of when a gesture starts;
- when a genture end compare the end position and time to the initial gesture event. If it's a swipe then tell tab host to change the current tab;
add animations to make it feel more realistic. This is actually more complex than it should:
- when you detect the swipe give the current tab view a animation so that it slides out (to the left or right, depending on the direction of the slide)
- the activity should implement the
OnTabChangeListenerand theTabHostshould have the activity as a listener; - on a
onTabChangedevent then create a animation for the new tab. When it's a change due to a swipe I do a slide in animation, but if it is a change because the user pressed theTabWidgetthen I do a quick fade in animation.
The reason to use the GestureOverlayView is that it guarantees that we receive the MotionEvent. If we just listen for events (like onFling) in the activity then some events will not reach us as they will be consumed by the children widgets.
This works well when the tabs are horizontally laid (as when the device is in portrait mode) but for landscape (with the tabs laid vertically) it makes no sense as it interferes with the scrolling of the views within the activity. Anyway.. I'm starting to feel that this tabs really don't work for landscape and tablets…
I'll post some code and layouts about this soon.
I stated before: I dislike tasks that are not automated. Very much.
When developing a Android application one of the item to maintain is the version code (a integer) and the version name (a string). The version code should be a unique number of each new release of the application and the version name should allow users to clearly state what release they are using.
Here is my very simple solution to automate this version control: have the build system define the version code and post fix it to the version name using a formatted time stamp. This way the constant incrementation of the version code is guaranteed and the version name has a easy reference to that code. One small detail: I prefix the version code with a fixed digit number that is a reference to the major version (release) of the application.
So here relevant part of the application manifest:
    1: <?xml version="1.0" encoding="utf-8"?>
    2: <manifest xmlns:android="http://schemas.android.com/apk/res/android"
    3:  package="org.bitpipeline.app.windsurfcalculator"
    4:   android:versionCode="0019999999"
    5:  android:versionName="1.0 beta 1 - 0019999999">
    6:  <!-- version code is redefined during build to a number with the following format:
    7:    3 digits for versioning,
    8:       4 digits for the year,
    9:       3 digits for the day of the year
   10:       IMPORTANT: don't change the number in the version code and name as it's used as the token to be replaced -->
In the build.xml (I'm using ant as the build system for android applications) a uncomment and implemented the targets -pre-build and -post-compile.
The -pre-build target:
    1:     <target name="-pre-build">
    2:  <tstamp>
    3:   <format property="timeStamp" pattern="yyyyDDD"/>
    4:  </tstamp>
    5:  <echo level="info" message="Changing the version code and name to timestamp value ${timeStamp}"/>
    6:  <replace file="AndroidManifest.xml" token="9999999" value="${timeStamp}"/>
    7:     </target>
The -post-compile target:
    1:     <target name="-post-compile">
    2:  <echo level="info" message="Returning version code and name to predefined values"/>
    3:  <replace file="AndroidManifest.xml" token="${timeStamp}" value="9999999"/>
    4:     </target>
Now every build (as long as done in different days) will have it's own version code and name. Builds within eclipse will always have the same version code and name. Each major release of the application will lead to the creation of a maintenance branch where the version code first four digits will be incremented.
Most of the Web hosting companies provide a FTP to publish the set of files that form the website. FTP is a really good way of transferring files between two hosts: it's simple and fast. Unfortunately that simplicity is also it Achilles heel when it comes to publishing a web site you're creating off line. The problem is that you would have to keep track of the file changes, transfer the changed files and remove any file that was deleted locally. Too much trouble for me.
The solution, or at least a solution, is a based on two concepts:
- mounting the remote ftp site in the local host;
- syncing the locally created Web site to the remote mounted file system.
To mount the remote file system I use curlftpfs, a filesystem based on FUSE which implements a user level file system over FTP.
After having the remote filesystem mouted in the local host it is easy to synchronise it using the good old rsync although I had to tell rsync to ignore errors that show up when it tries to change the time stamp of the remote files.
As I like to automate everything I created a Makefile with the following targets:
    1: mount:
    2:  curlftpfs -o tlsv1 -o user=USER FTP_HOST LOCAL_MOUNT_DIR
    3:
    4: umount:
    5:  fusermount -u LOCAL_MOUNT_DIR
    6:
    7: publish: ~/mnt/bitpipeline/web
    8:  rsync -recursive -verbose --progress --delete-during --ignore-errors LOCAL_WEB_DIR LOCAL_MOUNT_DIR/REMOTE_WEB_DIR
Where:
USER
: is the ftp user name
FTP_HOST
: is the remote ftp address to use
LOCAL_MOUNT_DIR
: is the directory where the remote ftp site will be mounted
LOCAL_WEB_DIR
: is the directory were the Web site is built (in the local host)
REMOTE_WEB_DIR
: is the remote directory that is root of the Web site file system
It might happen that your host does not support TLS, which is bad: your password will be travelling in the Net without any protection from preying eyes. If you still want to use this scheme than remove the option -o tlsv1 from the curlftpfs command.
Then the workflow would be:
- run "
make mount". You'll be asked the password for the user. - develop the web site (I use ikiwiki to generate the site).
- run "
make publish". This might take some time… - if you have more work to do go to step 2.
- run "
make umount".
The last step might fail if any process has any file descriptor open to the remote file system. Find which process (using lsof for example) and have it close that file descriptor (this might mean terminating the process). Or you can add the "-z" to the fusermount command. That will make it do a "lazy umount", meaning that the file system will be invisible to all processes except those that have a file descriptor open to it and as soon as all file descriptors are closed the file system will be properly unmounted.
To have the needed tools in my development machine (using gentoo) I had to unmask net-fs/curlftpfs.
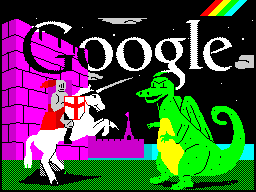
The first computer that I ever laid my hands on celebrates its birthday today. The venerable Spectrum 48k is 30 years old counting from the launch day and google UK decided to honer this day with the image you see on the right. That brings back some very good memories.
What a marvellous machine it was, how it made me dream, how eager I was to learn how all those letters and numbers came together to form something that seamed so much more complex.
It's been a long time since I played with a ZX Spectrum but emulators come to the rescue of the nostalgic. I'm using fuse to remember the good old fun (there's a good one for Android named Marvin).
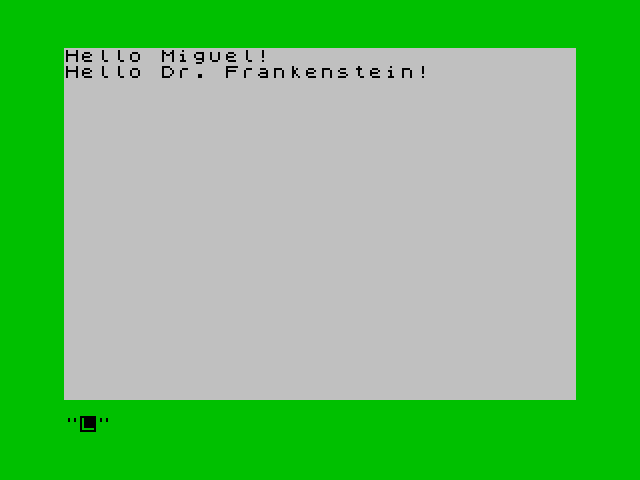
Here's a my half a minute Hello World in ZX Spectrum BASIC:
10 BORDER INT (RND*6)
20 INPUT n$
30 PRINT "Hello ";n$;"!"
40 GO TO 10
And for for those of you that didn't go through a "spectrum" phase, here is more or less what it would look like:
 |
 |
I remember reading a book named Chaos (I forgot the name of the author), a book about fractals and strange attractors and implementing the algorithms in book. It's was wonderful to see those beautiful images show up on the TV.
Those were some good days of exploring the wonders of programming…
I didn't really like the launcher icons for WindsurfBuddy, so I changed them. Hope you also find them better looking.
![]()
I think I'm getting better at using gimp but still far for being a easy walk in the park.
Programming is fun. Creating the visual artefacts for the user interface is less so.
![]()
That is, obviously, my opinion. Today I decided to try and get some proper icons for the WindsurfBuddy (I started to call it just WsB…).
Here is the result so far. What do you think? I can't actually say I like it... to many gradients. I think I might go for something a bit simpler like plain colours and some embossing. Not now though. I'm tiered of pixels.
With WindsurfBuddy I am targeting devices running at least Android 2.1 so I can't use all the great UI features of newer versions (like the actionbar).
I creates a resemblance of the title bar by using a embedded layout and extending the TabActivity classes.
There are still lot's of stuff to improve but it seams to be working all right.
I also wasted some time creating some drawings of generic boards and sails. This way the application doesn't depend on copyrighted bitmaps and is functional without the pretty images of equipment. I still need to draw some fins though…
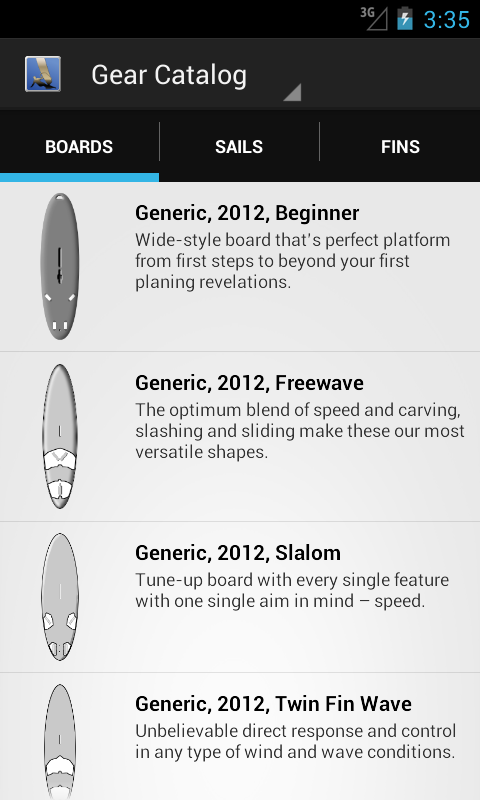
So what's the idea when selecting a board? Well, a board has a range of sails that with which it can be used. An example: if you select a wave board you can't take a 12m² race sail. The sails that you can't use will "disappear" from the sail gallery. Also if you want a beginner board where's no point in showing you the boards that have less than 120 l at least.
With the fins it's the same. You select a board and then only the fins that fit that board will be available. Even if it's a multi-fin board.
One thing that I would like to add in the future is equipment that is owned by the user as a filter the equipment database. Will see how that goes…
Uploaded the code to two small old tools I did a long time ago. Both are for use with WindowMaker:
wmSu : a su with a X11 graphical interface using WINGs (the graphical toolkit that WindowMaker uses).
wmMailMenu : a WindowMaker dynamic menu tool that creates a hierarchical tree of contacts and launches a email client to send emails. Supports old kmail and pine address books.
This old projects are now mostly useless (to me at least, as I'm not using WindowMaker now) but I wouldn't like them to just disappear so uploading them to the cloud (in this case to github seams like a good solution. Who knows… maybe I'll pick them up just because I miss developing in C, still the most concise and beautiful programming language.
 |
 |
| wmSu | wmMailMenu |
Keeping the computer clock synchronize as close as possible with the rest of the world is important for a number of reasons, form just being on time when the calendar events warning goes off, to more IT stuff like making sure that file synchronization with remote servers works properly.
The network protocol everyone uses for this is NTP (Network Time Protocol) and there are several implementation one can choose from (and as usually Microsoft totally messed it up with it's windows time service).
On a device that is most of the times connected, although it's to different networks, but is sometimes on its own I think it makes sense to use something that can adapt itself to its environment. So I went in search for a NTP program that was created with this on/off in mind and behold I found chrony, a small and easy to configure NTP client and server (I'll be using it only as a client).
When installing gentoo (my favourite linux distribution) on my current laptop I decided to give NetworkManager another try. Although it's a bloated piece of software (just look at the number of dependencies it has) it has become more or less pervasive in the Linux desktop (what a pitty) so I guess I should get familiar with it. Somewhere in the not so distant past it also started to allow for scripts to be run when a network interface became connected or disconnected, unfortunately in a very basic way. When any of those events takes place the scripts that are in the dispatcher.d directory will be called with two arguments: the name of the interface and the "status" (up or down).
Rather basic but enough to use chrony.
First step is of course installing chrony. Then create a file that will contain a key for the access to the chrony daemon. I created it in /etc/chrony/chrony.keys. The content of that file is just one number and a string separated by a space. Several keys can be defined by using several lines, although I don't really understand the advantage of that. Something like:
1 keypassword
2 secondkey
After creating the keys file we can now edit /etc/chrony/chrony.conf to configure the daemon. Here is my configuration:
## selected servers by running
##   netselect -s 4 -t 3 pool.ntp.org
server 95.211.148.1 offline
server 83.98.155.30 offline

keyfile /etc/chrony/chrony.keys
commandkey 1
driftfile /etc/chrony/chrony.drift
You can see that I set two NTP servers but mark them as being offline. I will use a NetworkManager dispatcher script to bring them on or off line. netselect is a wonderful tool to find out the IP addresses of servers that are closest to you.
This static definition of the NTP servers is a Achilles heel of this current configuration and I might look into making it more dynamic in the future (for example the dhcp lease might include information on NTP server in the current network).
Then at last we have to provide the dispatch script for NetworkManager to use. I named it 10.chrony and placed it in the directory /etc/NetworkManager/dispatcher.d:
    1: #!/bin/bash
    2:
    3: INTERFACE=$1 # The interface which is brought up or down
    4: STATUS=$2 # The new state of the interface
    5:
    6: CHRONY_PASSWORD=`cat /etc/chrony/chrony.keys | cut -d " " -f 2`
    7:
    8: case "$STATUS" in
    9:  'up') # $INTERFACE is up
   10:
   11:   /usr/bin/chronyc <<EOF
   12: password $CHRONY_PASSWORD
   13: online
   14: EOF
   15:
   16:   ;;
   17:  'down') # $INTERFACE is down
   18:   # Check for active interface and down if no one active
   19:
   20:   if [ ! `nm-tool|grep State|cut -f2 -d' '` = "connected" ]; then
   21:
   22:   /usr/bin/chronyc <<EOF
   23: password $CHRONY_PASSWORD
   24: offline
   25: EOF
   26:
   27:   fi
   28:  ;;
   29: esac
What the script does is read the key from the chrony key file and then use the chrony command line interface to change its state to online or offline (only if all interface are offline).
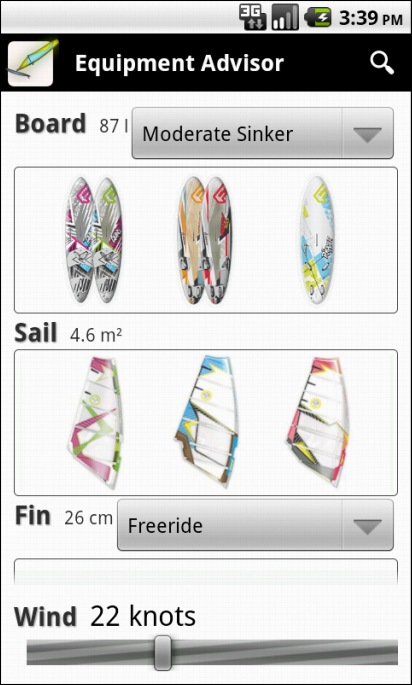
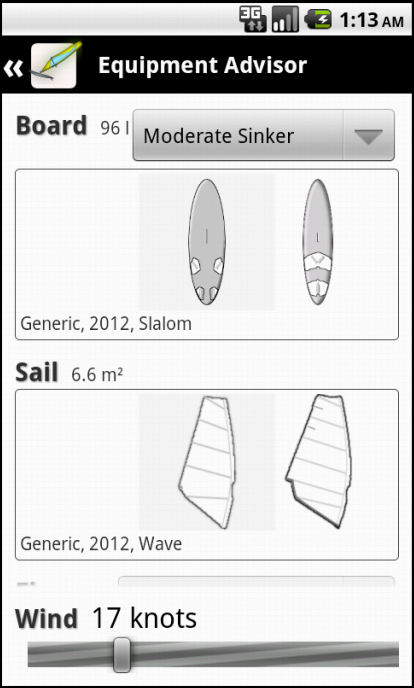
Just to share the evolution of the windsurf calculator, that I renamed WindsurfBuddy as in the mean time another application with that name showed up in Google Play store (I hate this name...)
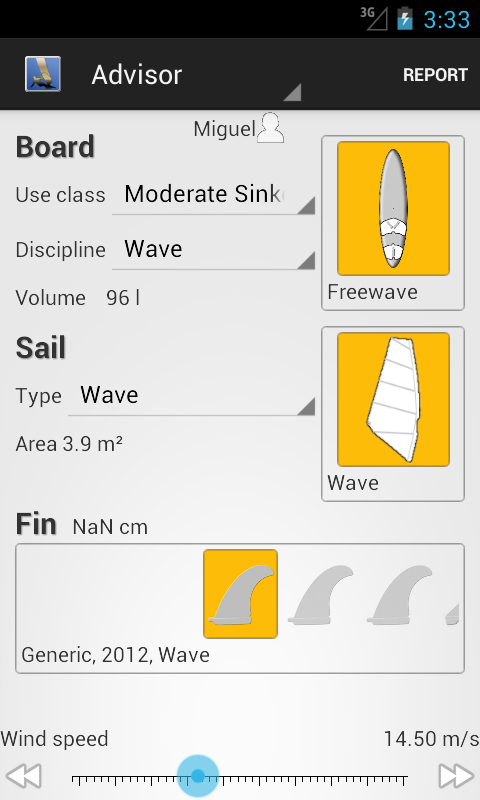
Here I show the activity used to advise on what equipment to take into the water. The images of the boards are from Fanatic and the sails are from North Sails. I'm using them just for developing and as such in the end the listed equipment will be different. They do look good.
I won't be pushing this changes into github as I have no rights on the images for the boards and sails. In the future I'll replace them with some generic drawings.
Inside each of the equipment frames it's possible to do a horizontal scroll to see more items. I don't know if that's confusing, as there is a vertical scroll within the central view (between the titlebar and the area for entering the windspeed) and then there is this horizontal scroll areas. My tests were quite ok, but I have to show it and let other people play with it.
The usage work flow is to, change the wind speed, select the type of board and fin that you want to use. The application will provide you with a small set of boards, sails and fins you can use.
I actually have some ideas of how to make this advisor more useful by letting the user customize the content (the list of equipment) but that will be for a future post.
Today I released as LGLP most of the code of a framework that I created to conduct experiments using a grid or cluster of computers.
The main motivation was to automate all the process of launching the experiment, retrieving several metrics of the systems involved, processing the metric (both in real time and in more time consuming off line mode) and also introducing controlled faults in the systems (to check how they survive).
Soon I will follow also push the documentation and examples of how to use the framework.
After eight years of service my poor old companion notebook, a Sony Vaio VGN-S2XP, was in need of retirement and a new laptop had to be bought. After searching around a bit my choice fell on a Toshiba r840-125. Good price, good video card, good feeling to the hardware and a trusty brand (you would not find me getting a HP or Dell for sure).
Unfortunately it's still almost impossible to buy a computer without paying homage to Microsoft Coorporation and to deliver money to their doorstep even when we have no intention of using it's faulty OS. Ok, maybe not faulty, maybe just slow, laggy, buggy, annoying, incomplete, ugly, etc. You know what I mean and if you don't then you should try to get out some more... Incredible how governments allow this small sucking of their citizens to go on. If people don't give money to M$ then the gov guys could come and get some more, no? (this is irony)
Well.. so setting up a new machine... I decided to leave the legacy OS installed (that windows stuff) and the rescue partition too. This way if something goes wrong with the hardware I can try it with the software that was chosen by Toshiba.
That lead me to the first step of setting up the computer: partitioning the hard disk.
Partitions
Keeping the legacy OS and the existing partitions
This was the very easy part. Just record a CD with the wonderful System Rescue CD, boot it to a graphical interface and use GParted to do the hard work.
Toshiba ships this hardware with three primary partitions:
- Sytem, a hidden NTFS partition, a bootable partition where I guess the boot of the installed OS is
- disk, the normal disk for the owner to use (ahhh.. the assumptions the hardware manufacturers do...)
- HDRecovery, another hidden NTFS partition, where the data for reconstructing the original OS is
The first and third partitions I left them as they were (no resizing, no moving). The second I did resize to about 10% of its original size (little more than what was already being used.
Using one single extended partition for linux
In my experience with gentoo I became used to have the following partition layout:
/
: the root of the system, where the main OS is installed (binaries, libraries, resources, temporary stuff, etc)
/boot
: the place where the binaries and disk images needed to boot linux are placed
/home
: where the user home directories are located
/usr/portage
: where the portage tree (the files that describe each of the available software used by the system) is placed
It might not be the best possible layout but it works for me. Some people like to have a specific partition for /var but I can't really see the point and my machines have been running happily since '94.
I couldn't use primary partitions for my Linux gentoo system (only one of a limit of four was available) but I could use extended partitions (think of it as partitions inside a partition). So a extended partition was created in the freed disk space (from the resizing of partition two) and then three partitions were created, one for the /boot, one for SWAP and one for the entire linux system... but there's a catch. The last partition created is a LVM partition. With a bit more effort to do the initial setup of the system I will end up having a abstraction on the storage space - if I ever feel short of space I can throw away the space reserved by Toshiba for a legacy OS and simple expand (move and resize probably) the LVM partition to use more space).
Some tweaks for the partitioning
Most of the previous partition are straight forward to setup as ext4 (still one of the most stables and speedy fs for linux) but the last one, /usr/portage is somewhat special in it's contents: mostly lots of small files (less than 1 Kib).
My guess is that for this kind of usage it's a waste of space to only handle blocks of 4 KiB. At the expense of needing more space to have more inodes (the entries in the tree that describe the files that are on the disk) I rather have the filesystem managing more or less one block for each file.
Speed is also important in this partitions. The fastest it's possible to transverse all of its information the better for when using the portage tools. My gut feeling is that the easiest way to speed up reading information from the disk is to reduce the amount of data needed to be read. Therefore having small inodes is also a plus.
But enough chat chat. What options did I actually used when creating the filesystem for the portage tree? Well, here they are with a small description:
-b 1024
: use 1024 bytes per block
-i 1024
: one inode for each 1024 bytes of space, so one inode for each block so that in the limit we could address all the blocks in the filesystem
-I 128
: set the size of each inode to its minimum, meaning that there won't be any of the fancy stuff like extended attributes (I don't need them for the portage tree)
-L PORTAGE
: just labeling the filesystem
Just found this really good book about parallel programming.
- Title: Is Parallel Programming Hard, And, If So, What Can You Do About It?
- Editor: Paul E. McKenney
- Publisher: kernel.org
- Year: 2011
- URL: http://kernel.org/pub/linux/kernel/people/paulmck/perfbook/perfbook.html
- License: open source
Although I haven't read the entire book (I'm working on that) it's clear to me that not only is it written in a appealing way, it also seams to be rather complete.
I found this book just as I am looking into code that can be used as an example of why parallel programming is hard: programmers that do not understand machines make it so. Really, you would suspect that a programmer nowadays would know better than to do something like:
    1: public class Example {
    2:         private static boolean readOnce = false;
    3:         // XPTO is some kind of complex class.
    4:         private static XTPO complexObject = null;
    5:
    6:         public static XPTO doSomething () {
    7:                 if (!Example.test) {
    8:                         readOnce = true;
    9:                         complexObject = new XPTO ();
   10:                 }
   11:                 return complexObject;
   12:         }
   13: }
The issue here arises form checking a variable to decide or not to create the new XPTO instance. Picture this scenario:
- thread A is calls the method
doSomethingand finds the fieldreadOnceto be false, entering the if block; - before the thread A executes line 08 is interrupted and another thread (lets call it thread B ) also calls the
doSomethingmethod; - thread B is continues its execution and gets a
XPTOinstance, that is at that time the same instance that the instance of the classExampleis pointing to with the fieldcomplexObject; - at this moment thread B is interrupted by the scheduler, and eventually thread A is resumed, executing line 8 and forward;
- thread A creates a new
XPTOinstance and the fieldcomplexObjectnow points to a new instance, not to the one that was previously created by thread B.
The state of the application is now undefined as, although the programmer tried to guarantee that the same object of type XPTO was returned by the doSomething method, there are two different instances of the class XPTO.
This is, of course, a rather classic and very simple example. Yet I found such things abundantly in the code that I am working with now (yes, poor me).
What does it means when someone within the software development community tells you that something “it works”?
For me, whenever someone say such sentences, what it means is that the bar is set at it's lowest standard possible. It is working, nothing else matters. Only the now of the software project is relevant. I have seen so many projects that are walking at the edge of a cliff, being pushed closer and closer to that edge with each task that is done with “it works” mentality.
It's actually easy to most things work. It's harder to make them work always, to make them maintainable, to make them upgradable, to make them reliable, to make them any good. Unfortunately the “it works” mentality is one of the biggest (in my humble opinion) shadows within the software development community.
Some of the things that are usually done with this kind of mentality:
- the project build system: it's usually where more hacks exists within a project. From copying thing around to using deprecated components, to being an almost completely manual procedure...
- the testing of the project builds: the framework to do the tests.
- invention of new methodologies of software development: every week a new methodology will be invented. A new spreadsheet will need to be filled, more meeting will be attended...
- the reinvention of software components: programmers just want things "to work" and never looks around in the code base and used software frameworks
- software architectures: that are never truly though in depth
- the numerous short-cuts taken: editing generated code instead of extending it, not cleaning up the code of parts that are no longer in use, etc.
The effect of this mentality is that is cancerous. One software developer that tries to raise the bar will be seen by managers as someone that is causing trouble and tacking more time for implementation. His (or her) colleagues will also become hostile as the constant attempts to improve the state of the project will be seen as accusations and attempts at being a "smart ass".
If this optimistic developers is actually good enough to push things then he will be endanger of being the sole person that actually does anything as other will rely more and more on him to suggest, implement and build every improvement and new features.
I really like TDD, or a very close approximation to it. Meaning that even though I might sometimes deviate from the pure test driven, I always find the writing of tests to be the best way to check the design of a piece of software.
When developing JEE I always spend a enormous amount of time setting up the environment for developing and testing. The framework that this guys did might just make it a lot easier:
- injection-extension
Today I decided to give up on Nokia.
For a long time the image that Nokia painted of it self was a picture of internal fights, of too many managers fighting for control of small issues and of having no one at the helm. They lost their target of creating something great to focus on petty internal fights and divisions.
For quite a long time I waited for the phone from Nokia that would again rule the market, a phone with a good software stack and reliable hardware. But also a phone with good support for indie developers, a phone that you could play with and learn.
Nokia had the know how to do such phone but not the management courage to do it. Now it's all over.
Maemo, Meego were two software stack that might have provided a breath of new air into Nokia but will now just fade away. Samsung seams to be able to create a software stack out of thin air while Nokia.. oh well, you get the picture.
So today I trashed my Nokia phone, deleted my Ovi account, and moved on to greener pastures.
I deleted the account as I have no trust that my private information would be safe from a certain major Nokia parter that has a rather bad reputation when in come to privacy and respect for the costumer.
So long, and thanks for a broken heart...